Friday, April 23, 2010
Friday Night App.
We are going to a recession wine party tonight. It's a wine party for the hard times...apps and cheap wine...wine under $10. I wanted to share the appetizer we are going to bring with us. It's the easiest appetizer EVER and always seems to be a huge hit!
Wednesday, April 21, 2010
Mother's Day Decorative Dish Towels: Tutorial/Giveaway!
GIVEAWAY CLOSED!

Can't decide what to make for mom? What about a new set of decorative dish towels?! With Mother's Day right around the corner I was thinking I needed to get on the ball! I have wanted to make decorative dish towels for sometime now, but have never gotten around to it. Making them for a Mother's Day gift is perfect excuse to cross them off my list! I thought I would share this tutorial with you so you could make them too!
In this tutorial I make the long ruffled decorative dish towel.

REVISED!
So Sorry! I woke up in the middle of the night thinking...
did I give a width for the green dot and blue/green print??! I looked and sure enough I hadn't. I apologize! I added the width of the 2 and 3 coordinating fabrics.
Materials: fabric (I used 2/3 coordinating fabrics), scissors, thread, sewing machine/serger, rotarty board/cutter/ruler, trims(optional)
The dish towel measure 28 inches in length and 17 inches in width
I used a fat quarter (A fat quarter measures 18x22 so I needed 6 more inches to get 28 inches in length) for floral fabric (18x22"), Green Dot (40x6")and Blue/green print(40x3") I gave myself some extra room for seam allowance. About a 1/2". When all was said and done Floral fabric in length was (20"), Green Dot (5.5")and Blue/green print(2.5") After you cut your fabric...
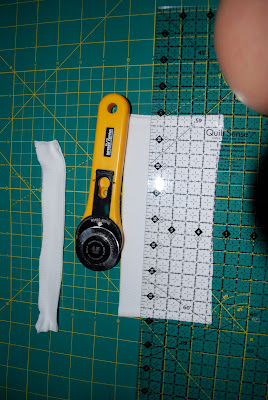
1) I put rights sides of the green dot and blue/green print together and serged. If you do not have a serger you will sew and finish with a zig zag stitch to prevent fraying.
3) Hem by folding over 1/4 of an inch and then again 1/4 and sew. You will be pressing with the iron each time you do this. If you have a serger you can serge in place of the first folding of 1/4 of an inch.
4) Set your sewing machine up for a basting stitch.
5) Pull the top string to gather, go slow so it doesn't break. Gather until the green dot fabric is the same width as the floral fabric.
6) Match up, right sides together, with the main fabric with coordinating fabrics.
7) Pin and Sew
8) Serge or Zig Zag stitch to finish the edge
9) Top Stitch for a clean/finished look.
11) Finally top stitch the flower material right above the green dot like in #9 and you are finished!!!
And you have your Mother's Day gift ready to celebrate mom/sister/daughter/friend.
Now for the exciting news...
I am giving away one of my decorative dish towel sets!!!
You may want to enter if...
you don't sew, but would love some new decorative dish towels.
you do sew, but don't have the time.
they match your kitchen.
you need new dish towels.
you have a mom in mind you want to give the to for MD.
you love free stuff.
someone used yours for an oven mitt and now they are "toast."
you just want 'em for yourself!
Giveaway Rules:
1.Become a follower of 2 Giggle Boxes and leave a comment with your email address saying which set of towels you fancy.2.Post this on your facebook or twitter page and leave another comment saying you did so.
3 Blog about it and comment!
Giveaway ends ON Thursday, April 29th at noon EST
Giveaway ends ON Thursday, April 29th at noon EST
A comment will be chosen at random on random.org and posted next Thursday, April 29th!
Thank you for stopping by and playing along!
Sarah
Which one would you choose?!
Mismatched Green and Blue Floral
Tuesday, April 20, 2010
Spring Top Submission: "Day to Date Night"
This is my 2nd submission for Spring Top week. It's kinda addicting! This top is different from my first submission "In Full Bloom" in that I didn't use a pattern! It's a little intimidating working from scratch and to be perfectly honest it's not at all what I intended, but I love it all the same:)
My thoughts behind the day/date night top are this...I often feel rushed getting the kids fed, bathed, and ready for bed before the babysitter gets here so I wanted a top that I could wear during the day and if need be turn it into something more appropriate for a date night. I used Anna Maria Horner's Little Folks fabric. This fabric and I have mentioned it in previous posts is so nice to work with. The day/date night top has elastic at the top and through the mid-section. I wanted something I could take off and on easily. The shoulder straps can easily be tucked into the shirt to give it a different look. The bottom of the shirt is serged using a rolled hem with yellow pearl crown thread. The belt and roses on the belt are also serged with the same thread. The belt is be fastened by a snap.
You can wear it by day...
and night!
Sunday, April 18, 2010
Podee to the Rescue
A friend of mine told me about the this the other day...the Podee feeding kit!
I picked one up at my local Babies R Us and it was a life saver the other night. I had two hungry kids, but only two hands to cook dinner. So...I hooked Clara up with the Podee, which allows for hands-free feeding...
while I made Carson this very yummy dinner of Sponge Bob mac & cheese and broccoli.
Tank Shirt/Dress with Ruffled Neckline: Tutorial


Materials: 3 coordinating fabrics, tank top, thread, sewing machine or serger, pins, scissors, rotary board, rotary cutter, and ruler
1) Cut your tank top 2/3 inches under the arm hole.
2) Cut 4 strips. The first one 4x44 inches, second one 2x44 inches, third one 3x44 inches and the fourth one 1x44 inch (unless you are using a sewing machine. You will want to cut 1.5 inches. The .5 inch will be for the hem).
Totaling 10 inches. You will loose about an inch with seam allowance. If you want to make a dress you will lengthen it as you see fit.
3)Take each layer and fold in half. Cut the side so you now have two pieces of fabric instead of one. You will have seams on both sides.
4)Sew/serge one end Right sides together. Repeat for each layer. Now you have one long piece with a seam in the center.
5)If you have a serger and would like the seams to be on the outside you will serge layer one to layer two wrong sides together. If you are sewing you will sew right sides together. Repeat for each layer until you have ONE piece of fabric with 4 layers. If you have a pattern that should be facing a certain direction make sure it's the way you want it before you sew (eg. I have birds and I don't want them upside down).
If you are using a sewing machine you will want to hem the bottom at this time. Fold bottom layer 1/4 of an inch and iron. Then 1/4 of an inch more and iron. Sew to hem.
6) Sew/serge the end right sides together
7) Use a basting stitch, and gather so that it is the same width of the tank
8)Fold the skirt up over the tank so that right sides are facing one another.
9) Line up the seams on the dress with the seams on the tank. Pin all the way around.
10) Sew and finish the edge with a zig zag stitch or serger
10) Press
Finished with the shirt portion! Now for the ruffled neckline...
Take your "leftovers" from the tank top.
Cut 3 1 inch strips from the tank.
Cut the strips at the seam and sew all of the strips together into one long strip.
Use a basting stitch down the center of the strip, and gather
Pin to the neckline of the tank
And Enjoy!
I had so much fun making this one I made 2! One for Carson and one for the Shop.
Subscribe to:
Comments (Atom)


