Saturday, March 6, 2010

Another Birthday Party!

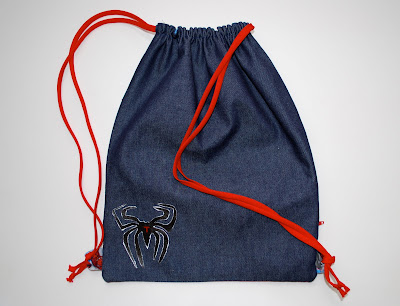
I think every weekend in March consists of either a birthday party or baby shower! Today is our good friend Taylor's 3rd birthday! Carson and Taylor have been hanging out since they were 4 months old. Carson adores him and wants to do everything Taylor does. Her recent obsession is with Spider-Man because Taylor loves Spider-Man. So for a gift nothing seemed more fitting than a Spider-Man drawstring back pack (Yea! I can cross it off my can't wait to try list) and a pair of P.J.'s!

The back pack is a little different than the one in the tutorial. I used jeans and a 12 in. zipper instead of an 8in. because that's what I had on hand.

I bought the Spider-Man fabric from JoAnn's. I used freezer paper stenciling(great tutorial here) for Spider-Man's face and the spider on the back. I used a picture from the computer to help me draw Spider-Man's face on freezer paper and the spider.

I put a "T" in the middle of the spider for Taylor!


The P.J. pants were adapted from this pattern. I like to call them karate pants when I make them for boys:) The shirt was embellished using a piece of the fabric and embroidery for the "I Am Peter Parker."


Enjoy Taylor...We love you!

Wednesday, March 3, 2010

I'm So Excited and I Just Can't Hide It!

Why am I so EXCITED?! One of my dresses made it through to the finals of the Design Challenge! WhooooHoooo! There was a total of 154 entries to the contest and the judges couldn't narrow it down to the intended 10 so there are 15 dresses that were chosen to be voted on by YOU (the link to vote is at the bottom of the page)! I am so honored to be one of those because all of them were fabulous! Here is the Chicken Nuggets dress and the story behind the name.
What a strange name for a dress…huh? The dress was inspired NOT from the food chicken nuggets, but the goldfish. My daughter chose to name her 4 goldfish “Chicken Nuggets.”

About the dress:

Pattern used:

The top of the dress is made from an old T-Shirt.

The bubble skirt was added to pattern piece C. C is the "anchor" for the bubble.

Fabric: The top is made from an old T-shirt and the goldfish fabric is from This and That from Japan. I absolutely LOVE the fabric! The pictures don't do it justice.

The crisscross back was later changed to halter back (seen in pictures).

The goldfish bowl was made from vinyl PVC and inspired by LBB's snow globe tutorial.

The goldfish in the bowl were cut out from the fabric and made into appliques and the seaweed was hand painted using Jacquard fabric paint.

The tie around the waist and bias/halter were made from bright, red cotton fabric.

Some of Carson's favorite activities with Chicken Nuggets are...

Blowing Bubbles
Reading
and Just Hanging Out!
Now PLEASE PLEASE PLEASE go HERE and VOTE for Chicken Nuggets!
Thank you!!!
Sarah

Tuesday, March 2, 2010

Ruffle Your Stuff!

There is a new button on the right side of me page! Disney from Ruffles and Stuff is hosting a craft competition and has some amazing prizes! Click on the button for details!

Monday, March 1, 2010

Tutorial: Art Clothesline

Got artwork? We do! And we display it on our Art Clothesline!
Last year after I finished Carson's mermaid room. I guess I should say Carson and Clara's mermaid room (I planned on them sharing a room, but that lasted one day!). I started working on the play room (which is now Clara's room). I added a chalkboard/magnetic wall (great tutorial here) and an art clothesline. The clothesline is super easy, inexpensive(I think I spent59 cents on each wooden piece)and you only need a few materials.

Materials: wooden animals/objects/letters (I got ours from JoAnn, but Michaels has them too), glue gun, string, clothespins, wine corks (one cork will give you two/three pieces so depending on how many fixtures you want will depend on the number of corks you need) and a pencil

First, mark on your wall where you want to glue on your wine corks.
Next, cut the wine corks in halves/thirds (it depends how far you want them to stick out from the wall).
Glue them onto the wall (If you are a teacher your probably have done this with posters and such in your classroom). In my experience, the glue will peel off the wall fairly easy.
Get your string ready. I just left mine on the roll to allow me to adjust as I saw fit and cut it at the end. Put a dab of hot glue onto the cork and wrap the string around several times (you might want to add a little more glue as you wrap). Do the same thing to the next cork and so on. Cut your string at
the end.
Finally, glue on your wooden pieces!
And your done!
If you want you can also glue little wooden pieces/letters to the clothes pins.
Your children will be so excited they have a place of their own to show off their favorite creations!


Sunday, February 28, 2010

Disney's JCrew Inspired Necklace Tutorial

So pretty, So easy and So affordable!

I was so excited when this arrived in the mail the other day!
Disney from Ruffles and Stuff posted this tutorial on how to make a necklace similar to this one at J Crew. And to make things even better her sister offered to sell kits at her shop for a $1.99 plus shipping...sign me up! This means I wouldn't have to drag two kids to the store to look for items I had never bought before. Now I was sure to make one! And I love how it turned out!
I have never made anything for myself and I have never made jewelry before. The tutorial was easy to follow and now I have a beautiful necklace for myself:) Thanks Disney!

Happy Birthday to LiLi!

We are off to a three year old birthday this afternoon! In honor of the birthday girl I made her a shirt dress and some lil leggings. I bought the t-shirt at Target and embellished it with some jersey knit fabric I got at JoAnn's a while back. I love all the ruffles! I also added an "L" for LiLi and a sweet lil fabric flower on the shoulder.

Two reasons I love handmade gifts...
1. They are personal and one of a kind!
2. They show thought, energy and time were spent to create something special.

I packaged it up...

and we are off!
Enjoy Miss LiLi and Happy Birthday!

Related Posts with Thumbnails