Showing posts with label challenges. Show all posts

Thursday, March 31, 2011

2nd Entry for the Lil Blue Boo/Dharma Trading Co. Challenge

Circus Seal...

I have had an idea of what I have wanted to do with my 2nd entry for the challenge since January. Of course I have procrastinated until TODAY (the last day to enter the challenge) to finish my project. But it all worked out. Carson hung out in my room with me while I sewed and Clara napped. I finished just as Clara was waking up, tried the outfit on her and took pictures right before the monsoon came. 

I chose to do a circus themed outfit. The idea popped into my head this past January when the circus was in town. Who doesn't love the circus?!  Everything about the circus is exciting...animals, performers, costumes and music, not to mention the delicious cotton candy and popcorn. 

A few days later I was browsing all of the yummy fabrics and saw this colorful summer time fabric by Barbara Jones. It was perfect. I love the mix of dark and light colored polka-dots. I imagined the circus animals and performers...jugglers, elephants, lions, seals, etc. I thought it would be neat to turn the dots into balls for the performers/animals. After browsing some pictures I decided to use the seal and have him balance a "ball" on his nose. This elephant is super cute too!


I used the freezer paper stencil method for my seal applique. I thought I took pictures, but I can't find them...sorry. I will have to do it again, maybe one for Carson this time.

There are several tutorials online for using freezer paper for stenciling. Ashley has a great one here.
In a nutshell...I traced my seal onto the freezer paper and used an exacto knife to cute it out. Then I ironed it onto the fabric and painted (using fabric paint). I let it dry and lifted up the paper. Then I hand painted around the "ball" and the star in the middle of the "ball"

I took the painted, scrap fabric and made it an applique. Then embellished it with a ruffle (from the coordinating fabric on the bubble skirt-Pouty Princes) and black ric rac.  It was an easy way to spice up an outfit. And I have to say that I LOVE this bubble skirt. I will definitely be making more!

Clara was a great model today. As anyone who has a toddler knows, taking pictures can be quite the ordeal!  But today...
She sat...

 and smiled...

 twirled around a bit...
 and showed off her teeth.
Thanks for being such a good girl! I love you!

Can't wait to see the rest of the entries. There have been so many fabulous ones so far. I love looking at everyone's projects and reading the thoughts behind them. Each one is so unique. You should head over to Lil Blue Boo and check them out! Thanks for stopping by!
~Sarah

Friday, June 11, 2010

Towels for Summer


I am in still in summer vacation mode. Trying to get ready for our trip next week to a very warm and sunny island! It will be much like the climate here in FL, but it will certainly be nice to get away for a little R and R. While on vacation I thought we would take along some towels with our new friend "Lisha"(Leesha)...

Isn't she cute!? I named her "Lisha" because it means "full of mystery." She hides her face with her gigantic sun hat. She was inspired by this quilt...

It was my husband's quilt as a baby and I just love it! I love it's bright colors and the simplicity of it. One day soon I will make a big beach quilt similar to it with "Lisha" on it. For now I just put her on three different types of towels...


I know what an ordeal it is to go anywhere with two little ones. So I thought it I would make it a little easier for Carson to carry her own towel and lighten my load a little. She can throw her tote over her shoulder and carry her towel by the ribbon. This way it won't drag on the ground. It will also keep her from tripping over it. It was very simple...
Just cut a ribbon 40inches. Or longer depending on how long you want the bow.
Pin it in the center, bottom of the towel.
Test it (to make sure it will tie the way you want. One side will be longer than the other because it has to go a further distance to meet the other side)
And sew in place using a box. You can also sew an "x" inside the box for reinforcement.
Lastly, singe the ends of the ribbon with a lighter. This will prevent fraying.
That's it!


Fold one end to the center...

Then the other and roll tightly towards the ribbon.

Spread it out, relax and take it all in!

I embellished this towel with "Lisha" and a "C" in Amy Butler's Lotus Brown Lacework fabric. I used a little lace trim on her shorts.

Then there is the...

"Lisha" is wearing a one piece bathing suit here. I still added lace trim to her one piece suit and of course her large sun hat.


I used California Dreaming fabric in Pink by Jenean Morrison. I love the bright colors and it's pattern easily lends itself to being turned into one of "Lisha's" large sun hats.
You can find my tutorial HERE for the hooded towel.


I had some towel scraps leftover and was wondering what I was going them for...then I saw this post. It was the perfect size for a toddler cover-up. I made it a wrap around cover up placing velcro in two different places on the cover-up. The halter straps also have velcro on them.

We also took some time out to get a couple shots for Father's Day!


I think they'll make a good gift for daddy's desk!

Thanks for visiting! I hope you like the "Lisha" towels! I know she will make another appearance...just don't know where...tote, dress, skirt...any suggestions?

Linking up with...


The Girl Creative
Making
The DIY Show Off
Keeping It Simple

Entered in...

Wednesday, June 9, 2010

The M&J Challenge...

is up! And can I say WOW! Everyone did such an amazing job! I am so honored to be among these talented ladies! You can view my tutorials...


along with the others HERE! Thank you to M&J Trimmings for hosting this challenge. I know it took a lot of work to put this together and it looks fabulous and is truly inspiring!

Wednesday, May 19, 2010

M & J Challenge

This arrived on my doorstep today!


It was a package I have been anticipating since last week! So I opened it...


And I found another lovely box with a note. Before I even read the note I ripped into the package and found this...


Have you ever seen so many wonderful trims in your entire life? And the presentation was so beautiful. I didn't want to disturb them, but I have to! Because it's another CHALLENGE for M&J Trimming! Last week they contacted me along with other crafty bloggers asking if I would be interested in entering their challenge...My answer...OF COURSE! I hadn't any clue about kinds of trims or even the color scheme until it arrived on my doorstep this afternoon. So what's the challenge? The challenge it to take what has been given to me and create DIY projects to share. Soooo stay-tuned because all DIY challenges will be posted here Wednesday, June 9th.

I can't wait to share what I create with you! And I can't wait to see what the other bloggers have up their sleeves!

Wednesday, May 5, 2010

"In Full Bloom" Made the Cut!

I was so honored when I received a message on my flickr account that my top is up for voting today! Yea! Please, Please go VOTE! There will be 6 days of voting and the top with the most votes each day will be voted on again in the finals!


Tuesday, April 20, 2010

Spring Top Submission: "Day to Date Night"

This is my 2nd submission for Spring Top week. It's kinda addicting! This top is different from my first submission "In Full Bloom" in that I didn't use a pattern! It's a little intimidating working from scratch and to be perfectly honest it's not at all what I intended, but I love it all the same:)

My thoughts behind the day/date night top are this...I often feel rushed getting the kids fed, bathed, and ready for bed before the babysitter gets here so I wanted a top that I could wear during the day and if need be turn it into something more appropriate for a date night. I used Anna Maria Horner's Little Folks fabric. This fabric and I have mentioned it in previous posts is so nice to work with. The day/date night top has elastic at the top and through the mid-section. I wanted something I could take off and on easily. The shoulder straps can easily be tucked into the shirt to give it a different look. The bottom of the shirt is serged using a rolled hem with yellow pearl crown thread. The belt and roses on the belt are also serged with the same thread. The belt is be fastened by a snap.

You can wear it by day...
and night!

Monday, April 12, 2010

Spring Top Submission: "In Full Bloom"

I am always up for a good challenge:) This will be the third one this year (Lil Blue Boo/Dharma Trading Co., Ruffles and Stuff and now Spring Tops) and I LOVE it! It really pushes me to explore my creativity and actually finish projects. So often I start something and don't finish. Does anyone else share that vice?

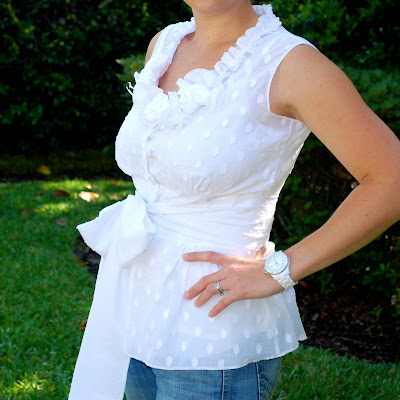
Spring Tops contest is a little different from the past two. I have to make something for myself!!! The only other thing I have made for myself is this. I have never actually made a piece of clothing for me until now! Truth be told...my kids look way cuter in clothes than I do and are much more fun to sew for. But without further ado...here it is...
I call it "In Full Bloom." Here is my journey in completing my first top for me!

I sat down...well, not really. I had both kids with me. I stood up and in between potty breaks and feedings I browsed through the pattern books at the store. There were a couple different ones I liked, but ended up choosing Simplicity 2601.

Things I loved about the look of the pattern...
Style -classic, simple, feminine and a tailored
Versatility-dress up and dress down...could be worn with a skirt, shorts, dress pants or jeans.
It also had several different options for sleeves and collars.

Then I was off to choose some material that I thought would compliment the style of the pattern. I chose a light weight 100% percent cotton for the main fabric and a swiss white dot fabric for some of the flowers, covered buttons and sash. I loved both the look and feel of the fabric. I was also looking for a fabric that I would want to wear through the hot/humid Florida summer. And it was 30% off...an added bonus!

Now, since I wasn't creating the shirt from scratch I needed to make it my own. I started thinking about what I love about a shirt and next to comfort it's definitely how it's embellished. Flowers, buttons, ruffles and sashes are four embellishments I used. I knew I wanted to incorporate these items into my shirt, but I didn't know exactly how. So I turned to my favorite store...Anthropology. I don't think there is one item of clothing that I wouldn't buy from that store...if I had unlimited funds that is, but I don't...so I use their clothes as an inspiration for my own. This, This and This were all inspirations for embellishing my shirt. I love a ruffled neckline, beautiful fabric flowers and a sash to define the waistline.

So...after I finished the basic pattern for the shirt I made the little flowers
I made "Yo Yo" flowers, little roses (I serged the edges of these first) and what I like to call "scrunch and sew" flowers. Not much to them. I just cut a circle scrunched it into a flower and sewed it to tack it in place. Then I wanted a little fray, but also wanted to contain it so I applied a little fray check to the edges of the flowers. In the center of two of the flowers are covered buttons. For the ruffle along the back of the neckline I used a scrap piece of fabric about 2 inches in width. I serged the sides with a rolled hem and then sewed a basting stitch down the center. I gathered, pinned, and sewed it into place. Voila!


I love it! It's comfortable and makes me feel pretty! And I think that's a big part of this contest. If I have time I may make a couple more spring tops! If you sew you should treat yourself too!

Thanks for hosting Rae! It's been fun focusing on me for a change!
Related Posts with Thumbnails