Friday, February 26, 2010

More Mermaids


Apparently I am into mermaids right now(changing pad cover up and hoodie towel). So I thought I would share this project with you! I don't have pictures of the process because I did it last year and blogging never even crossed my point at that time, but I will explain to you the best I can how to do it. I also included my drawings so you could make one too!

Last spring, while dad of 2 giggle boxes was out of town, I redid Carson's room. She is in love with mermaids so there was no doubt that would be the theme. I saw these at PB Kids and they were the inspiration for her room. They didn't have bedding that went with the theme so I bought their sea table cloth and tweaked it a little(covered the hole(for the umbrella) in the middle with a circle applique and monogram and put a soft,fuzzy backside to it) to make a blanket for her bed. I also purchased a couple throw pillows, rug (Target), some sheets (I love Target's flannel sheets), but needed one thing...a lamp. I bought a lamp and plain white shade at Target, but wasn't satisfied.
A while back I saw a lamp shade at PB kids that had a silhouette of a tree and a bird inside the shade. I thought...I can do that with the mermaid theme! So I used the mermaid paintings as a starting point and hand drew the pieces that would be my mermaid. It had been many years since I had decoupaged anything so wasn't sure how it would turn out. I was excited about the finished product and my daughter loves her mermaid lamp!

I wanted to share my drawings and the process with you!
Materials: water, Elmer's glue, paint brush, an assortment of tissue paper, lamp shade, pencil/pen, and scissors.

Print out the mermaid template here.
Mermaid Decoupage 2
Choose the tissue paper you would like for each piece, trace the mermaid parts on the tissue, and cut out the tissue pieces.

Mix your water and glue. I didn't measure it out. I just poured glue in a bowl and added a little water. You want the consistency to be not too runny, but not too thick.

Some of the pieces will be layered. First, I painted the flowers onto the tail with my glue/water mixture. Then the fin decor onto the fin, the top onto the body and the body onto the hair. I put the mermaid together before I glued it onto the shade.

Then I chose where I wanted to place my mermaid. I turned the lamp shade so that I was working on the inside of the lamp. Everything will go on the inside! I held it down with one hand and lightly brushed the mixture over the mermaid. Sometimes the tissue can crinkle up. Go slowly and take your time. Try not to lay it on the counter. It will stick fast and rip.

After I had the mermaid in place I added the bubbles, starfish and fish. I laid it out before gluing it down just so I could get everything as evenly spaced as possible.

I let it dry and then tried it out! I love how you don't even know it's there until you turn on the light!


The possibilities are endless, planes, trains, birds, etc. Happy decoupaging!

I might stick with the mermaid theme a little longer. Maybe swim suits and sun hats to match their cover-up and towel??

And the Winner is...

True Random Number GeneratorI plugged numbers 1-23 into the generator and here is the result! Then I counted down the list of comments until I got to number 10. 10Congrats to Laurel Riffey who said...
Laurel E. Riffey said...

Saw Melissa's post on FB. I became a follower! Bookmarked your etsy shop too! Love cute little creations!

Becoming a "Follower" and Leaving Comments

Like me, many of you are new to the blog world. I have received many questions about becoming a "Follower" and leaving comments. I hope this helps...
Click HERE to learn more about becoming a Follower.
Click HERE to learn more about leaving a comment.
****************************************
Less than 4 hours until the Follower Giveaway ends. If you still want to enter go HERE and follow the Giveaway Rules.
Reasons to become a Follower and Enter the Giveaway...

1. You have a baby/child.
2. You know a baby/child.
3. You are going to have a baby.
4. You like to sew.
5. You like FREE stuff!

Have a great day!
Sarah

Thursday, February 25, 2010

Tutorial: Scraps Hooded Sea Beauties Towel and Scrapplique Seahorse


I was at the park with the giggle boxes and some friends the other day when my friend Julie mentioned she had seen a hooded towel at a baby shower. She explained how it was put together and suggested I make one, so...I did with baby Clara in mind.

Materials: Scissors, Rotary board and cutter, ruler, disappearing ink pen, pins, thread, sewing machine, iron, ironing board, one towel(you will only use half of it if it's a large towel), one washcloth(you will only use half of this too), half a yard of material or scraps, fusible web if you want to do an applique and whatever template you want for the applique.
Optional: Serger

I started out with two wash clothes and a towel. I cut material the size of the wash clothes, sewed it on, put the wash clothes right sides together and sewed up two sides of the wash clothes. When I finished I realized that it was going to be too big for her little head so I went another route.


So this is where you BEGIN!
I took one wash cloth and cut it in half diagonally.
Then I realized I am running out of the Sea Beauties material and need to improvise. So I went through some bags of scraps and found a material I thought complimented it well. And I am glad I did! I love the look of the two fabrics together.

I laid the strips down on the wash cloth until I was satisfied with how they looked. Then I trimmed them a bit so they matched up with the wash cloth. They don't have to be perfect because there will be a bias around the edges of the towel.

Put right sides together and sew, press seams and do the same with the other pieces. It will look like a pyramid when you are finished and will match up with the shape of the towel.

Then top stitch each piece.

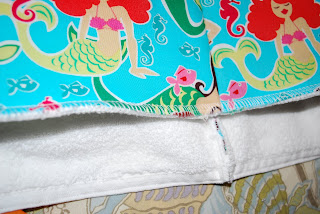
Sew the material to the towel, wrong sides together.

Now for the bias that will go on the bottom of the hood. Measure and cut a 2 in wide piece of fabric and the length you need. Cut.

Fold in half and press. Open up and fold the two sides in to meet in the middle. Then fold that in half and press.

Next cut your big towel in half, take one of the halves and and fold the corners over so it matches up with the other side. You are squaring the towel off. Mine ended up being 26x26.

I also cut any thick edges off so it would be easier later to sew on the bias and rounded the top of the hood.

Now pick a corner of the towel round it and put the hood part right sides together with the towel, pin and sew.

Serge or Zig zag stitch to finish the edge. Turn it right side out and press.

Now for the bias around the entire towel. The material is 44/45 inches wide and the towel is 26x26 so I need 104 inches of bias. I cut 3 2in. strips of fabric. You will have some left over, but you can cut it off at the end.

Now sew the three 2 in. pieces together: Take two, sew right sides, then take the last pieces and sew it right sides together to the other two. press seams.

(see pics above, same process and directions as hood bias)

Take bias and begin on one end of the towel(I started at one of the ends opposite of the hood) and sandwich the towel between the bias, pin and make sure bias is even.

It becomes difficult when you get to the hood because it is so thick, just do the best you can with the pinning. I ended up taking the pins out when sewing that section.

Begin sewing. Make sure the bias is even on both sides. You don't want the stitch to hold one side and not the other. I stitched about 1/8 inch from the edge. When you get to the hood use one hand to guide and the other to help lightly pull the material through. I took the pins out at this point and went slowly.

When you get to the corners fold it over a bit and continue sewing. When you get to the end fold the end piece over so the raw edges are tucked inside and sew.

You're finished!

I embellished the towel with a seahorse applique. I have bags full of scraps so I used scraps for my applique. I really liked the look and plan to do more scrappliques!!

I sewed the scraps together just like for the hood of the towel. Pressed the seams and applied the fusible webbing. If you need a tutorial on applique you can find a good one here.

Then I traced the seahorse using my seahorse template (I printed the template out from the computer).

Ironed it on and stitched around it...DONE!

Now to try it on sweet Clara! I would have taken her out to the beach for pictures, but it has been unseasonably cold here...brrrrr.

Wednesday, February 24, 2010

Cover-up REMIX


click HERE and scroll down for REMIX tutorial

Monday, February 22, 2010

Lil Blue Boo/Dharma Trading Company Design Challenge

I was so excited about this! Ashley from Lil Blue Boo announced that she would pair up with Dharma Trading Company to put on a design challenge. The contestants were to choose one of her patterns to use to create an outfit, embellish, and submit! Six weeks passed and 151 designs were entered! It was so excited to see everyone's entries. There was so much creativity and originality. You can view the gallery here.

I submitted three entries...

The judging takes place this week. Judges will choose ten creations and then there will be a public vote! I am so excited to be part of such fun challenge!


Follower Giveaway! Another Way to Enter to win!

Another way to enter to win! Post my blog on your facebook page, and add another comment saying you did so!

Hi Everyone!
I am officially a blogger:0) I have enjoyed reading and learning from other blogs so much that I figured I would start my own blog. It is such a great way to share ideas and LIFE with others. So, I am celebrating my first post with a giveaway! Giveaways are one of my favorite parts about blogging and what better way to start a blog than with one. So what am I giving away?! If you are selected you can choose any item from my shop.

Giveaway Rules:
1.Become a follower of 2 Giggle Boxes
There are two ways to enter to win!
2.Leave a comment in this comment section AND your Email Address in your comment.
3.Post my blog on your facebook page and leave another comment saying you did so.
Giveaway ends ON Friday at noon EST
A comment will be chosen at random on random.org and posted ASAP on Friday afternoon.
You will also be contacted via email

Thank you for stopping by and playing along! I am excited about my new venture as a Blogger!

Sarah

Tutorial: Terry Cloth Changing Pad Cover to Cover-Up

I am sure I'm not the only one that feels like they are constantly cleaning and switching out kid's clothes for bigger sizes. While doing so, I found a changing pad cover that my eldest giggle box had when she was a baby (I got a new one for little giggle box). It was still in great shape so I thought hmmm what can I do with this? I know...a cover up/shower rob!
So...we are going from this
to this!
Materials: Rotary board, Rotary cutter, Ruler, disappearing ink pen, scissors, sewing machine, and thread
Optional: serger

First I cut the corners so that the cover would lay flat.

Then I folded the cover in half and cut down each side.

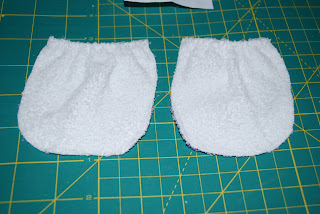
Then I unfolded it and cut down the middle so I had two pieces. I also cut two pieces for the straps (10x4.5), and two pockets. For the pockets make a template from paper measuring 3x3.5. Line the top of the pocket up with the elastic of one of the scrap pieces. Next trace around the template with a disappearing in pen. Now that all your pieces are cut you can get started sewing!
Straps Pocket Template

Put right sides together and pin down one side. Then sew. Finish off the edge with a serger. You can use a zig zag stitch if you do not have a serger.

Snip Corner

Next use your serger around the bottom of the cover up. Again use a zig zag stitch if you do not have a serger.


Next measure who you are making the cover up for. My GB measured 20 inches around her chest right under her arms. I made sure that the cover up fit her perfectly before sewing the other side. Put right sides back together, pin, sew down that side, and finish with seger/zig zag stitch. Snip the corner just like on the other side. Press the seams.

Now for the straps and the pockets. Fold the straps and press wrong sides together. Then use serger/zig zag stitch around each strap.

Next, serg/zig zag around pockets.

Pin straps and pockets to cover up. Find the center of the cover up and pin the straps about 2 inches from the center in the front. In the back pin straps about 1.5 inches from the center. If you want them a little closer move each strap in .5 inch.

For the pockets pin about 2 inches from the side of the cover up.

Sew

And Enjoy! You are finished!
Keep it white...

or Embellish

Either way your little GB will love it!

Changing Pad Cover to Cover-Up REMIX


Many of my projects become projects themselves. This one was no different. I altered the original cover-up to suit my 2 and a half year old. Carson is into dressing herself. I guess not just dressing herself, but doing EVERYTHING herself. She is a broken record..."I can do it by myself." I hear that phrase in my sleep, like I am sure many of you do:) So, the original cover-up was difficult for her to get over her head.

I cut up the middle of the back so she could put it on without going over her head.
Then I measured around the edges (50 in.), multiplied it by 1.5 (75in), and cut two 4 in. strips.

Sew the two 4 in. strips together, press seam and fold over and press
I used a gathering stitch and left a long string at the end to make gathering a bit easier, pulled the bottom thread to make the ruffle. Don't pull too hard. It may break and that is frustrating! Then you have to start over...so go slow.

Then lay the ruffle on top of the edge of the cover up so the raw edges line up, pin the ruffle and sew (sew above the gathering stitch). After you are finished sewing pull the gathering stitch out. Serge or Zig Zag stitch around the edge.
Next I chose a button, made a button hole, and sewed on the button.
If you don't want to do a button you could do velcro.

And we're done! Yay. I think I will leave well enough alone:)

Sneak peak for the next tutorial...


Related Posts with Thumbnails