Friday, April 2, 2010

Easter Outfits and Eggs!

I finished the girls' Easter outfits last night! I am excited about how they turned out. I used Anna Maria Horner's Little Folks fabric for both outfits. It is so soft, light and flow-y. It is the perfect material for twirling too!

I made Clara a bubble outfit from Sis Boom patterns. You can find it HERE. I LOVE the pattern. It has three different options for sleeves (sleeveless, puffy sleeves and ruffle sleeves). I went with the ruffle sleeve. It was the first time I used it and will be making many more bubble outfits. It is perfect because it doesn't get in Clara's way and doesn't "drown" her like some dresses/outfits do. Oh and it's reversible!!! Two in one! If you sew...try it! I added a little flower clip too. I just ruffled up some material and glued it to an alligator clip. That way I can clip it to the side of the outfit we choose to wear. If I have time I may make her some little booties and a flower for her hair.

Carson's dress was adapted from Lil Blue Boo's Sundress tutorial. I changed it up a little. I made the chest band a couple inches longer and the main portion of the dress 90 inches so it would be full. I also made the straps elastic, added a sash and a fabric flower with rhinestone center.

Easter Eggs!
We dyed eggs today. Carson has been hounding me since we bought the kit the other day. We had a great time. She especially liked the stickers. But she didn't want to use them on the eggs...just her baby sister:)

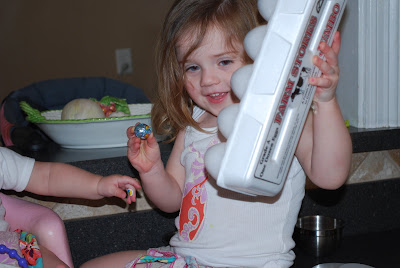
While we were waiting for our eggs to become hard boiled and our tablets to dissolve we played a game using our empty egg carton. Carson is learning her numbers (and letters) so I wrote a number in each egg spot all the way to twelve.We placed a chocolate egg in the carton...

closed it up and gave it a big shake.

When she opened it up she had to tell me the number underneath the chocolate.

After a bit I let her eat it...and she enjoyed!

Then we finished our eggs! And we can't wait for the big hunt on Sunday!
Happy Easter everyone! Have a blessed weekend!

Monday, March 29, 2010

Rufflelier: A Tutorial


The Rufflelier is perfect for a little girl's room, playroom or for an outside tea party! It is so easy, inexpensive and quick to make. I think it took me 15 minutes to put together.

Supplies: poster board, coordinating fabrics (you will need a total of 8 x 60 inches of fabric for all 4 pieces), hot glue gun, thread, 4 pearl strands 23-25 inches in length (I used some necklaces that had broken) sewing machine, stapler, pencil

Cut two pieces of poster board that will total 8 x 42 inches (two pieces 8 x 21 inches). I allowed for a one inch overlap on each side. Staple the two pieces together. You will have a circle that is the "skeleton" for your rufflelier.

Cut strips of fabric totaling 2 x 60 inches. I was using a fat quarter so I cut 3 strips. Repeat 3 times with the same fabric or coordinating fabric. If you want a tighter ruffle make your strips longer (2 x 80).

Sew rights sides together so you now have one long strip 2 x 60 inches in length. Repeat for the other strips. I left my strips "raw" on the edges, but you could serge them or hem them. If you want to hem them you would want to allow for a wider strip. instead of 2 inches you might do 2 1/2 inches.

Now sew a gathering stitch down the middle of the stip. Your machine should ruffle it a little.
Repeat for the other strips. Pull the ruffle until it's gathered to your liking. Not too much or it will be too short:)

You are ready to glue on your ruffles. I laid them out like I wanted time before I glued them onto the poster board.
Glue, glue, glue and glue

Now for the pearls...Mark with your pencil 4 dots 10 inches apart and about 1/2 inch from the top. The ruffle will cover the hole. You can use a hole punch if it's not too large. I couldn't find my hole punch so I just used my scissors and twisted them back and forth until I had the hole size that I wanted. Then I stuck one pearl from the strand into the hole and reinforced it using the hot glue gun. I connected the pearls by interlocking them with one another. I like how I had a little extra at the end to hang over.

Lastly I attached a string to the pearls to hang from the tree.

Hang it and LOVE it!

Those you love will love it too! It was a great addition to our tRuffles and tEa party.

If you have any questions please email me. I would love to see your versions!
sarahmlboyd (at) yahoo (dot) com


Saturday, March 27, 2010

My Stuff is Ruffled!


tRuffles and tEa


Yea! I have been waiting all month to post my Ruffle Your Stuff submission! I can't believe March is almost over. Where does the time go?

Anyway...

When Disney from Ruffles and Stuff announced her competition would be to Ruffle Your Stuff I immediately thought of the my nieces and how fun it would be to have a tea party! I have four nieces (one of them is 11 and didn't participate...preteens:)) and two girls of my own. What is better than 5 little girls wearing ruffles, sipping tea, eating treats and having a great time?! My idea was born...tRuffles and tEa. I was off to the drawing board to design and make dresses, props and accessories for the party...all with ruffles of course! I used two of my favorite fabric designers for my projects...Amy Butler and Anna Maria Horner. I LOVE their style and working with their fabric.

I used different kinds of ruffles, appliques, covered buttons, buttons, ruffled flowers, pockets and designer 6 thread as a detail. I loved seeing the girls get their dresses. They all seemed so excited to get dressed and play tea party!

The girl's dresses...
Clara's dress is a double layered skirted onesie complete with a ruffled bum! There is also a ruffled flower accent with covered button and the shirt.

Payton's dress is adapted from the sweet dress pattern.
It's covered in six layer's of ruffles, a sash and ruffled flower. Each ruffle was serged on both sides using a bright pink thread.

Carson's dress is made from attaching 4 layers of ruffles to a yellow t-shirt and has a ruffled flower accent with a covered button. I also sewed on some flowered buttons under the neckline. I used yellow designer 6 thread to serge the edges of the bottom ruffle and top ruffle as well as the flower. I love the shimmer it gives to the dress.

Paige's dress is adapted from Lil Blue Boo's halter pattern. I added three layers of ruffles and an applique of a butterfly and flower from the fabric.

I love bubble skirts and dresses! Avery's bubble skirt is light and comfortable. It has two ruffled pockets and her t-shirt has a matching ruffled initial "A". I thought it would be perfect to wear with a pair of jeans.

and hair accessories. No outfit is complete without them!
I used Anna Maria Horner's fabric for the dresses and accessories.

I chose to use Amy Butler's Love fabric line for the table decor. It is so bright and beautiful!
Ruffled initial placemats...
2 fat quarters will make two placemats or a placemat, napkin and ruffled ring. Tutorial is coming soon!

with matching napkins and ruffled napkin ring holders.

Every tea room needs a chandelier...ours is made of ruffles and pearls...Rufflelier
It was super quick and easy to make...Tutorial HERE!

The girls had a fabulous time!
They ate...
The table cloth is made from Amy Butler's Love laminate fabric line.

Played...

Hung out...

and Enjoyed each other's company.

Yea for cousins!
I don't know who had more fun...me or the girls!
Thanks for stopping by! And thanks to Disney for hosting Ruffle Your Suff!
Related Posts with Thumbnails