
Turn a plain tote into something fun and personal!
Fancy up your tote with a few simple items...
Simplicity large tote bag ($3 with coupon @ JoAnn's)
6 Grommets (pack of 8...$9)
Fabric (3 pieces measuring 30" in length and 3" wide) I cut some length off at the end and the finished length measures 71". I used Michael Miller's Sea Beauties.
Invisible Ink Pen
Sewing Machine/serger
Are you ready? Let's get started!


Use your stencil and an indivisible ink pen to trace where you are going to place your grommets. I placed the stencil right at the top of the bag. I put a grommet under each handle and one on each side of the bag.


Cut out the middle of the circle. I fold the material in half and snip it. Be careful not to cut outside the circle. It can be tricky where the fabric is a little thicker.

There is the finished hole.

Now take the front and back of the grommet and place it around the cut out circle and SNAP! Do the same thing for the other 5 grommets.

Side Note: Here is my little helper...

eating and showing off her new teeth!

Back to the tote...Take your fabric strips. I had three scrap pieces of fabric that I was going to use for something else, but decided not to...that happens a lot! Anyway, my strips measured 3" x 30". Sew them right sides together and you will have one long piece.

Press the seams.

Then fold the material in half right sides together and press. Note to self: I need a new ironing board cover! And to repaint my nails:)

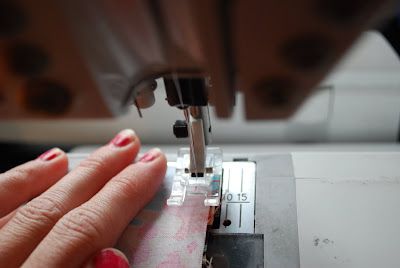
Sew or serge a 1/4 inch down the open side of the fabric. Leave the ends open...do NOT sew them at this time.

Now turn the fabric right side out. The easiest way to do this is to attach a safety pin to one side of the fabric. Now push the safety pin through until it comes out the other side.


Now press the fabric ribbon.
Cut the fabric ribbon on an angle and tuck the raw edge inside.

Sew 1/8" and repeat on the other side of the fabric ribbon.

Viola! Now I thought the fabric ribbon was a bit too long so I cut a few inches off each side and repeated the previous steps...tuck edges and sew.

Much better!

I like to embroider and so I gave it a personal touch. I added an "A" for my niece Avery. She is turning 7 next week and this is going to be the gift bag for her gift. I like giving reusable gift bags/baskets. I mean if you are going to spend $5 on a gift bag that is going to get tossed you might as well spend a few extra dollars on something you can reuse...right? If you don't have access to an embroidery machine you can always do an applique or iron on transfer. This would make a great teacher's gift too!


Thanks for stopping by! Have a great day!
Linking up with...


3 comments:
Hi, I saw your post on Tales from Bloggeritaville and loved the bag you posted. The blue fabric looks gorgeous on the white bag. -- Yoli
A fantastic tutorial, Sarah. It's really well done. I even think I might be able to manage this one. Fingers crossed. x
What a difference the grommets make--wonderful!
Post a Comment